FJORD yarn: scandinavian pattern can be simple (knitting pattern)
-
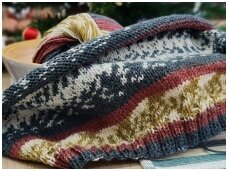
Scandinavian patterns and sweaters decorated with them are one of the symbols of winter. You get warm only looking at them. However, not everyone dares to try to control two, three or more balls constantly intertwining with each other. And even if you are determined, nothing really guarantees you knitting pleasure. Therefore, Fjord threads become a real blessing here, but also an extremely engaging game.
It's great when yarn manufacturers are full of ideas on how to make one or other yarns as interesting as possible, and we are offered more and more interesting knitting ideas. Scandinavian patterns are that knitting classic that is always on top, charming and desirable, but quite complicated, because several balls intertwine with each other, the transferred thread can become too tight, and so instead of knitting easily and quickly, we get involved in a rather complicated process. Therefore, some manufacturers are thinking about how to make this process much simplier and more like an interesting game, rather than solving a complex mathematical equation.
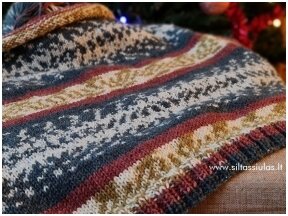
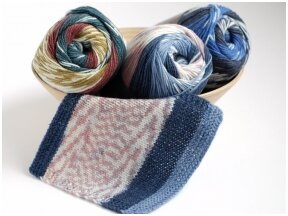
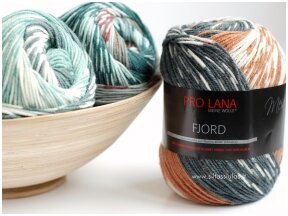
Each ball of German producer Pro Lana Fjord yarn is already ready for knitting charming patterns. The yarns are dyed in such a way that by simply taking one yarn and starting to knit, your knitwear will automatically start to be printed with motifs reminiscent of Scandinavian/Norwegian patterns. Simple, charming and easy.
SPECIALTIES OF FJORD THREADS AND KNITTING
- Quality. As much as 70% of these yarns consist of the highest quality merino wool, and this is immediately felt when you take the yarn in your hands and even more so when you start knitting. The threads are of high quality, the feeling of the wool great, the knitwear is very, very soft and fluffy.
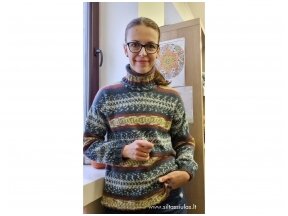
- Roughness/gentleness. Fjord yarn can be 100% worn close to skin. Garnments can be knitted for adults, children or anyone who is sensitive to the touch of wool. I made my sweater with a high, fitted neck and it really doesn't feel wool when I wear it. It is pleasant, warm and good for me (although we are convinced that this yarn is soft for us, I still add that this is a subjective assessment, because we are all different and maybe it may appear differently to some. Although in this case, I would be surprised).
- Pattern. The knitwear prints very nicely according to the intended pattern. You can see what the knitted colors look like in the photos uploaded to the color of each ball. in the our on line store. The colors are expressive, charming but calm combinations have been selected by the manufacturer. You won't find particularly bright tones here, but when creating the palette, it was aimed to create color combinations that reflect a calm Scandinavian style. It worked 100%.


- The layout of the knitting pattern. Keep in mind that the way the pattern will be laid out in your knitting depends on the width of the knitting. A scarf with a width of 40 - 50 stitches will be printed in one way, a sweater knitted in separate parts with a width of 100 stitches will be printed in a completely different way, and a knitwear knitted in a circle from the top will be printed in another way (in this case, the stripes will be quite narrow and the style of Scandinavian patterns will be more difficult to notice).
- Knitwear after washing. Although the knitwear looks soft and gentle just right when you knit, it becomes even softer after washing or steamedwith iron. However, you have to keep in mind that after washing/steaming, the knitwear stretches a little, flattens out and finally increases in volume compared to the just knitted one. Therefore, before counting the stitches of the knitting, it is strongly recommended to knit a sample and wash it or iron it with steam, because it will slightly change its volume. And exactly after doing this, you can already count the number of stitches of the future knitting.
- Needles. This time, we honestly did not understand why needles of this thickness (5.5 - 6.5 mm) are recommended, because we have no idea what can be done with Fjord threads and such needles. The yarn, although fluffy, isn't really thick (100g/350m or 50g/175m when devided in half) so if you knit this yarn on at least 5.5mm needles you'd get an extremely loose and difficult to control knit, considering that merino wool is always recommended to be knitted as tight as possible. Unless you want to knit a scarf from the smallest amount of yarn and you do not care how its shape will change later. 3.5 mm needles are very good for knitting. I knit more loosely, so even after starting with 3.5 mm, I later changed them to 3.25 mm and it just what I needed. The knitting still remained very soft, the stitches were really not compressed, fluffy, but there were no unnecessary "space" between them.
- Warmth. Although the threads are not very thick, the sweater turned out to be very pleasantly warm. And wearing a thinner, light but warm sweater under a thick coat or jacket in the cold winter is always very nice.
KNITTING THE FJORD SWEATER
General features:

- size: very loose M, more tight L or approximately size 38/40;
- needles 3.5 - 3.25 mm;
- 4 balls (400 g), which was a pleasant surprise, because I expected to knit really more;
- knitting density after washing 10 x 10 cm = 22 stitches x 32 rows;
- knitting is very fun and fast, because the overlapping patterns are so engaging that it's hard to stop :)
- the knitting is very simple: we knit the back and front in separate parts, sew them together, knit the neck after gathering the stitches and knit the sleeves after gathering the stitches.
Back part of the sweater
These types of Nordic patterns are always associated with winter, leisure, camping, a cozy mountain house with a fireplace, tea and cozy time in the company of best friends. So the idea was a free-style, easy sweater that fits with jeans and has nothing to do with tight and more elegant knitwear and life in the office. The knitting was supposed to spread the message that I feel cozy, comfortable and good.
So if you like this idea of knitting and you wear approximately 38/40 size clothes, you can safely cast on 110 stitches. If you wear clothes that are slightly larger, this width of the knitwear will be alittle bit tighter for you. If you wear size S or size 36, you will get a fashionable flat knit. So, taking this number of stitches as a reference, you can adjust it according to your size or individual desire (and if you knit and wash a sample beforehand, it will be absolutely perfect)
Next, we knit as follows: 10 rows it 2x2 rib stitch (2 knit, 2 purl), and then 160 rows with the most simple flat knitting: knit from the right side and purl from the other side.even. You need to relax, knit, meditate while watching the knitting become colorful with wonderful patterns and enjoy what you are doing.
Shoulder line
The knitting is divided as follows: 37 shoulder stitches - 36 neck stitches - 37 shoulder stitches.
We have to lower those 37 eyes very slowly and "softly" if we want nicely fitted shoulders without any corners standing in the air. So we decrease step bu step like this: we cast off 2 stitches at the beginning of the row (the knitting decreases by 2 stitches) and we knit together the last two stitches going back with the wrong side at the end of the row (we knit those two last stitches with the right stitch, hooking them on the front of the needle from left to right) the knitting decreases by 1 more stitch), so after knitting back and forth in total, we cats off 3 shoulder stitches. And we do this until we have lowered all 37 eyes of the shoulder
NOTE: Why can't we cats off all 3 st at the beginning of the row? Because if we do this (we cast off all 3 stitches at once at the beginning of the row, and when we return to the wrong side we just knit all the stitches, turn the knitting and continue knitting again by casting off 3 stitches), we will get a shoulder line like stairs, which, firstly, will look ugly, secondly, it will be harder to sew and you will have those sewn corners in the seam. Lowering the stitches by removing the desired amount at the beginning of the row and then returning to the wrong side by knitting exactly the last two stitches, will allow you to create a smooth edge, without any steps or bumps, and such a smooth line is always easier to sew later and looks nicer.
Neckline of the back part
When you see that your shoulders are almost finished, and there are only 2 rows left to lower when knitting forward, in other words, after casting off the shoulders 10 times, returning with the wrong back side, we divide the knitting in half, collect the stitches of the left side on extra thread and work only with the right side of the knit:
- returning with the wrong side of the knitting, we cast off or collect 8 neck stitches on the extra thread, finish the row, knit together the last 2 stitches of the row together for the shoulder. We turn the knitting;
- we cast off 2 shoulder stitches, we knit a row to the end. We turn the knitting;
- returning with the wrong side of the knitting, we cast off or gather all the remaining 10 stitches of the neck, finish the row, knit together the last 2 stitches of the row for the shoulder. We turn the knitting;
- We cast off all the eyes of the shoulder as much as is left.

Now we collect the stitches of the left side of the knitting from the yarn orextra thread back on the needle and finish the left side of the knitting in the same way. The back of your sweater is complete.
Front part of the sweater
We cast on 110 stitches on the front in the same way, we knit 10 rows in rit stitch 2 knit, 2 purl in the same way and continue in the same flat way the rest of the piece. All the difference in knitting will be only at the top, due to the significantly more deepened neck.
We will deepen the neck through a fairly significant number of 18 rows (counting only the rows knitted forward). A more deepened neck will "lie" more nicely, the collar attached to it will not "climb" up, it will not create a wrinkle and there will be no feeling of "stifling", and it will be really comfortable to wear such a knit.
Front neck and shoulder knitting pattern (click on the photo to enlarge):

Well, those for whom knitting the neck is simple and self-explanatory can calculate everything by themselves and skip this part altogether.
Front neck knitting and shoulder:
- we knit 148 rows and while knitting the 148th row, i.e. returning with the wrong side back, we divide the knitting in half, collect the stitches of the left side and work only with the right side of the knitting: while knitting the same 148th row, we drop 3 neck stitches at the beginning of the row. We knit the row to the end, knitting all the eyes. We turn the knitting;
- Row 149. We knit until the end of our row (those rows on the right side, we forget the left side of the knitting for now). We turn the knitting;
- keep knitting following the pattern given above.
Now we do the same with the left side of the knit and we have a finished sweater front.
We sew the shoulders. We gather the eyes of the neck and knit the collar. When knitting, simply measure the knitting and make a neck that is most comfortable for you. I knitted an approximately 12 cm (measured when folded) high golf. Warm, good, cozy :)
The sleeves
Now collect the eyes for the sleeves. For the sleeves, I gethered has 84 stitches. Then, as I knit, I gradually narrowed them (in that narrowing row, by simply knitting two stitches together at the beginning and end of the row) over 2/3 of the length of the sleeve, until there were 70 stitches left. Then I knit the remaining third of the sleeve straight without tapering any more. My sleeve was knitted in 120 rows in total.
Then, before knitting the final rib stitch, I reduced the number of stitches on the sleeve from 70 to 40 stitches, by knitting 2 stitches together and not knitting single stitches here and there, to make 40 stitches, because that's the size of the wrist I wanted. You can make it narrower or wider, according to your hand. And then I knitted 10 rows in rib 2 knit, 2 purl.
We sew the sleeves and the sides of the sweater. That's it, the sweater is finished. You can go on winter trips or have an evening with friends. The sweater will definitely get a lot of compliments, and it will become a real star of the party among knitting people :)
You can find PRO LANA FJORD yarn in the webstore here. And if you are interested and want to knit this or a similar sweater for yourself, enter the code MANOFJORD while placing an order and you will get a 10% discount on these yarns :)
Always enjoy knitting and what you do. Your time to yourself is a gift you can give yourself even if Christmas has already gone :)
Best regards,
Milda
© All rights reserved. Text and/or graphic information on this website may not be copied and/or distributed in any way without the prior consent of Milda Gokiene. If consent has been obtained, using the information on this website, it is necessary to indicate the website www.siltassiulas.lt as the source of such information.
